Are you hesitant to tackle the installation of a wrought iron fence? Don’t worry – we’ve got you covered! In this step-by-step guide, we’ll walk you through the entire process, making it easy and straightforward.
From planning and preparation to adding the finishing touches, you’ll have all the information you need to create a beautiful and secure fence.
So, let’s get started and turn your yard into a haven that you can proudly call your own.
Key Takeaways
- Regularly inspect and address any damage or loose attachments to ensure the fence remains in good condition.
- Proper spacing, alignment, and installation are essential for a professional-looking and secure fence.
- Adding decorative elements like finials, post caps, and scrolls can enhance the aesthetic appeal of the fence.
- Proper care and maintenance are crucial for preserving the longevity, durability, and appearance of the wrought iron fence.
Planning and Preparation
Before starting the installation, it’s important to carefully plan and prepare for the placement of the wrought iron fence. The planning process involves considering various factors such as the purpose of the fence, the desired height and design, and any local regulations or restrictions. Take the time to measure the perimeter of the area where the fence will be installed, and mark the boundary lines. This will help you visualize the layout and determine the amount of materials needed.
Next, site preparation is crucial to ensure a stable and secure installation. Start by clearing the area of any debris, vegetation, or obstacles that may interfere with the fence. Level the ground and remove any rocks or roots that could affect the stability of the fence posts. Consider the soil type in your area, as this will determine the depth and width of the post holes. It’s also important to check for any underground utilities or pipes that may be present, and mark them to avoid any damage during installation.
When it comes to installing a wrought iron fence, it’s important to choose the right type and style that suits your needs and preferences. Consider factors such as the purpose of the fence, the desired level of security, and the overall aesthetic of your property.
Additionally, make sure to purchase the necessary tools and equipment, such as a drill, level, and wrench, to ensure a smooth installation process.
Lastly, gather additional materials such as concrete and fasteners to ensure the stability and durability of your wrought iron fence.
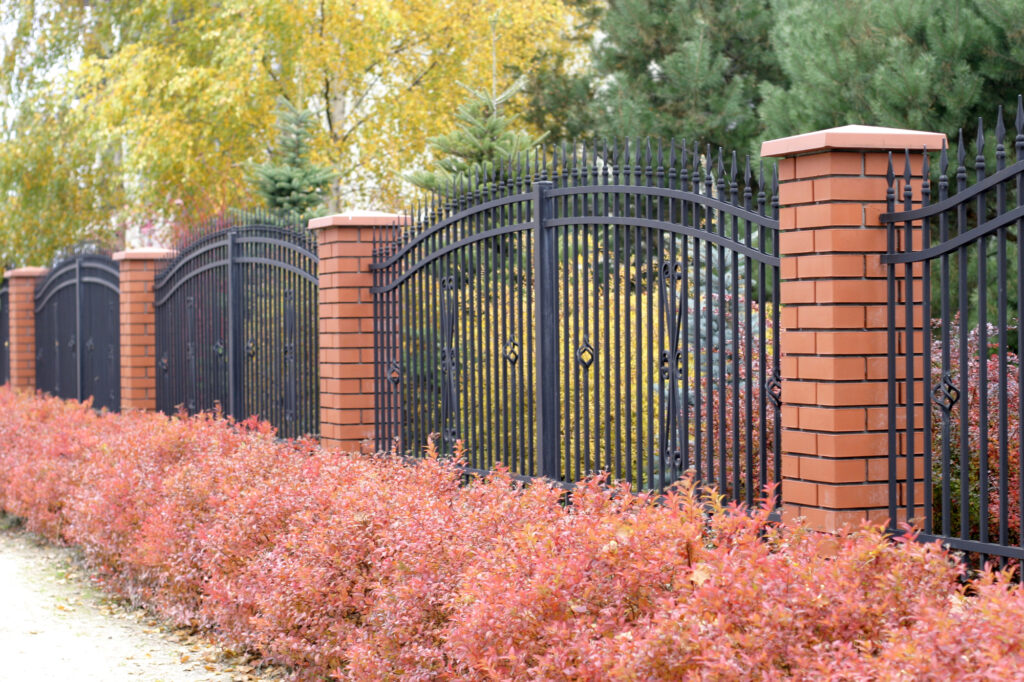
Choose the Right Type and Style of Wrought Iron Fence
To ensure you select the perfect wrought iron fence, it’s important to consider the right type and style for your specific needs. When choosing the design and height of your fence, think about the purpose it will serve.
If you are looking for privacy and security, a taller fence with closely spaced pickets would be suitable. On the other hand, if you want to maintain visibility and create a welcoming atmosphere, a shorter fence with decorative elements might be more appropriate.
Additionally, selecting the appropriate color and finish for your wrought iron fence is crucial to achieving the desired aesthetic. Consider the overall look of your property and choose a color and finish that complements it.
Now that you have decided on the perfect design and style, it’s time to move on to purchasing the necessary tools and equipment.
Now that you’ve chosen the perfect design and style for your wrought iron fence, it’s time to buy the tools and equipment you’ll need.
Tool selection is crucial to ensure a smooth installation process. You’ll want to invest in a sturdy pair of work gloves to protect your hands, as well as a tape measure for accurate measurements. A level and a masonry drill bit will also come in handy for ensuring that your fence is straight and securely anchored. Additionally, consider purchasing a wire cutter and pliers for any necessary adjustments or repairs.
Equipment maintenance is equally important to prolong the lifespan of your tools. Remember to clean and lubricate them regularly to prevent rust and keep them in optimal condition.
With your tools and equipment ready, you’re now prepared to gather additional materials, such as concrete and fasteners, for the next phase of the installation process.
Gather Additional Materials, such as Concrete and Fasteners
Once you have gathered the additional materials, such as concrete and fasteners, you can move on to the next phase of the installation process. Here are three important things to consider during this stage:
Concrete mixing techniques: Properly mixing the concrete is crucial for the stability and longevity of your wrought iron fence. Follow the manufacturer’s instructions and ensure that you achieve the right consistency. This will ensure that the concrete sets properly and provides a solid foundation for your fence.
Selecting the right fasteners: Choosing the appropriate fasteners is essential for securely attaching the fence panels to the posts. Consider factors such as the weight and size of the panels, as well as the type of surface you are attaching them to. Using the wrong fasteners can lead to instability and potential damage to your fence.
Ensuring proper placement: Take the time to carefully measure and mark the exact locations where the fence posts will be installed. This will ensure that your fence is straight and evenly spaced. Use a level to check the alignment and make any necessary adjustments before proceeding to the next section.
Now that you have gathered the additional materials and prepared the necessary steps, you are ready to move on to the installation of the fence posts. This crucial step will provide the foundation for your wrought iron fence, ensuring its stability and longevity.
Installing the Fence Posts
First, you’ll want to dig a hole for each fence post using a post hole digger. This is a crucial step in the installation process of your wrought iron fence. When digging the holes, make sure they are deep enough to securely hold the posts in place. A depth of at least one-third the length of the post is recommended. Additionally, ensure that the holes are evenly spaced and align with the layout of your fence.
Once the holes are dug, it’s time to install the fence posts. Begin by placing the first post into the hole and use a level to ensure it is perfectly upright. You can then fill the hole with concrete, following the manufacturer’s instructions. This will provide stability and prevent the posts from shifting over time. Repeat this process for each post, making sure they are all level and securely set in the concrete.
To achieve optimal results, consider a few post installation tips. Before pouring the concrete, moisten the hole to prevent rapid drying, which can weaken the bond. Additionally, ensure that the concrete is thoroughly mixed and free from any air pockets. Lastly, allow sufficient time for the concrete to cure before moving on to the next step.
Now that the fence posts are securely installed, it’s time to move on to attaching the fence panels.
Attaching the Fence Panels
When attaching the fence panels, it’s crucial to focus on three key points: positioning and aligning the panels, attaching them to the posts, and ensuring proper spacing and alignment.
Firstly, you need to accurately position and align the panels to create a visually appealing and structurally sound fence.
Secondly, securely attaching the panels to the posts will ensure stability and durability.
Lastly, maintaining proper spacing and alignment will guarantee a professional-looking finish to your fence installation.
Positioning and Aligning the Panels
To properly position and align the panels, measure and mark the desired placement on the ground. This is the crucial first step in ensuring a sturdy and visually appealing wrought iron fence installation. Consider the following positioning techniques:
- Use a string line or chalk line to create a straight guideline for accurate panel placement.
- Utilize a level to ensure that each panel is aligned horizontally and vertically.
Next, focus on panel alignment techniques:
- Check the spacing between panels to maintain consistency and avoid gaps or overlapping.
- Use clamps or temporary braces to hold panels in place during installation.
By implementing these techniques, you’ll achieve a professional-looking fence that adds value to your property.
Now, let’s seamlessly move on to the section about attaching the panels to the posts, ensuring a smooth continuation of the installation process.
Attaching the Panels to the Posts
Now that you have properly positioned and aligned the panels, it’s time to attach them to the posts. Attaching the panels securely is crucial for the stability and durability of your wrought iron fence.
To begin, you will need to gather the necessary tools, such as screws or brackets, and ensure that they are suitable for outdoor use to prevent rusting.
When attaching the panels, it is important to follow the manufacturer’s instructions and use the appropriate attaching techniques. This may involve attaching the panels directly to the posts or using brackets for added support.
Regular panel maintenance is also essential to prolong the life of your fence. Inspect the panels periodically for any signs of damage or loose attachments and address them promptly.
With the panels securely attached, you can now move on to ensuring proper spacing and alignment without compromising the overall integrity of your fence.
Ensuring Proper Spacing and Alignment
To achieve a visually pleasing result, ensure that the spacing and alignment of the panels are correct. Proper spacing and alignment techniques are crucial in creating a cohesive and professional-looking wrought iron fence.
Here are some key considerations to keep in mind:
- Measure and mark the exact distance between each panel, ensuring equal spacing throughout the entire fence.
- Use a level to ensure that each panel is perfectly aligned vertically and horizontally.
- Secure the panels tightly to the posts, using appropriate fasteners to maintain their alignment.
- Regularly check the spacing and alignment as you progress, making any necessary adjustments along the way.
By following these proper spacing and alignment techniques, you will create a fence that not only enhances the aesthetic appeal of your property but also provides a sense of belonging and security.
In the next section, we will discuss adding the finishing touches to complete your wrought iron fence installation.
Adding Finishing Touches
Once you’ve finished attaching the wrought iron panels, it’s time to add those final finishing touches to complete the fence installation. These last steps involve adding decorative elements and ensuring proper maintenance and care.
To enhance the aesthetic appeal of your wrought iron fence, consider incorporating decorative elements such as finials, post caps, and decorative scrolls. Finials are ornamental pieces that can be attached to the top of the fence posts, adding a touch of elegance and sophistication. Post caps, on the other hand, provide protection to the fence posts while also adding a decorative element. They come in various designs and materials, allowing you to choose one that complements your overall style.
Maintenance and care are essential to ensure the longevity and beauty of your wrought iron fence. Regularly inspect the fence for any signs of damage, such as rust or loose screws. If you notice any issues, address them promptly to prevent further deterioration. Cleaning the fence with a mild detergent and water can help remove dirt and grime, keeping it looking its best. Additionally, applying a protective coating or paint can provide an extra layer of protection against the elements.
Conclusion
In conclusion, by following this step-by-step guide, you’ve successfully learned how to install a wrought iron fence.
With careful planning and preparation, gathering the necessary materials, and utilizing the right tools, you’ve created a durable and aesthetically pleasing fence for your property.
Remember, attention to detail is crucial when attaching the fence panels and adding the finishing touches.
So go ahead, step back, and marvel at your masterpiece. Your fence will be the envy of the neighborhood, standing strong and sturdy for years to come.